 0.0.- in DreamweaverŽ, open a PHP_GenB dynamic page.
0.1.- select the object tab for the module you want to treat.
1.0.- click on item: "...initialize detail"
1.1.- enter the parameters requested by "...initialize detail":  1.2.- uid: is the identifier code provided by inte after initializing.
NOTE: click on the "refresh"  button when changing the identifier "uid" or to update the template and data information after changes in GenBnet. Atention it is necessary to have online access to the Internet. button when changing the identifier "uid" or to update the template and data information after changes in GenBnet. Atention it is necessary to have online access to the Internet.
1.3.- Preset detail: sets the data template with which to work (first drop-down menu), and allows you to fix the detail in case you always want to show the same data record (second drop-down menu).
1.4.- Language (language in the detail view): the language in which the data appear. The drop down menu will show the content languages we previously selected in GenBnet.
then, steps 2. and 3. ,incorporate the text or picture fields that make up the detail view:
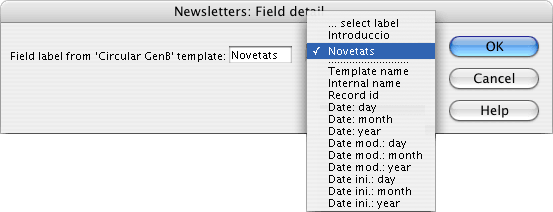
2.0.- insert text or doument-type contents fields. Click on the item: "...Field detail":
2.1.- enter the parameters requested by "...Field detail":  2.2.- Field label from '...' template: is the name or label that identifies the field to be shown. The drop-down menu allows you to choose from the fields user-defined (fields with names set by the user when designing the data template) for a template and the common internal fields (fields with names set by the system):
-."Template name". Name of the template the record shown belongs to.
-."Internal name" (internal reference). Name or reference that the user assigns to the record.
-."Record id". Internal identifier the system assigns to each record.
-."Date: day". part of the date entered by the user corresponding to the Day.
-."Date: month". part of the date entered by the user corresponding to the Month.
-."Date: year". part of the date entered by the user corresponding to the Year.
-."Date mod: day". part of the date corresponding to the Day of record modification.
-."Date mod: month". part of the date corresponding to the Month of record modification.
-."Date mod: year". part of the date corresponding to the Year of record modification.
-."Date ini: day". part of the date corresponding to the Day of record insertion.
-."Date ini: month". part of the corresponding to the Month of record insertion.
-."Date ini: year". part of the date corresponding to the Year of record insertion.
3.0.- enter pictures from the contents manager. Click on the item: "... Image list" (detail view of image): 3.1.- enter the parameter "Image field label" requested by "...Image detail":  when the preview template is ready, send the file to the remote server.
NOTE: to see the final results of a preview template with its contents you must proceed according to the explanation given in chapter page preview with contents |